Hello folks! Wow! It has been a long time since April when I wrote my last blog post about my ABAP Certification. Here we are again to a new beginning - I mean new company, experience, people, and learning. I am looking forward for the task that is assigned to me which will commence by early next year and it will be a knowledge transfer of the new product feature that they have here in my new company. In fact, I have gained a lot of experiences and new skills during that period like CHARM (SAP Change Request Management), HCM, more on Object Oriented Concept, configurations, and the new ABAP Enhancements which I would like to share with you after this topic. But, before that, allow me to share with you first my SAP implementation experience that happened after that April. That was a very surprising

Thursday, December 19, 2013
Tuesday, April 16, 2013
Finally Paid Off! - My SAP ABAP Certification

It took me at least 2 months of reviewing and learning other topics which I did not encounter in my job.
I took the SAP ABAP Certification in Makati office of SAP Philippines in Citibank Tower in April of 2013. I felt nervous, excited and worried that day. I can not help myself but my head keep throbbing and it was very unfortunate time as my father had been rushed to hospital few days before the examination. Prior to the examination month, I had already prepared myself by reviewing various TAW ebooks - thanks to my colleagues in HP (Hewlett-Packard) who shared me their copies of the reviewers.
Every night, I took at least two to three hours of reviewing the TAW ebooks one or two topic each day. I started with the first part of the TAW which is the Netweaver Architecture followed by Memories and Data Dictionaries. I had also spent a lot of time in learning the concept of ABAP Object Oriented Concept. I had also filed a vacation leave on the week of exam and I was spending my time reviewing in McDonald branch or Coffee Bean morning or afternoon while enjoying a cup of coffee with cupcake of course.
Thursday, February 14, 2013
Workflow Debugging with Break-Point
All through out my career in SAP as an ABAP developer, I admit that programming or debugging in SAP Workflow was very rare and seldom that I encountered it in my work. It was then a fortunate time, after 2 years, when one of my projects is using workflow to process its asset posting. I was so lucky then that one of our programmers is an expert in working with workflow which I did not hesitate to take the opportunity to ask so many questions with regards to Workflow especially in debugging. Many of us for sure, especially for first timers, who were assigned to debug a Workflow came across a situation where debugging of workflow was not an easy task or I say at least your break-point was triggered as an attempt to be able to have a peek if what is really happening on the variable that you think is the culprit of your problem! If you are currently looking for the solution, I can say that you landed to the correct page and you are very fortunate since, I was able to perfect and master this debugging dilemma in Workflow environment.
So to start with, there are two types of debugging techniques that I know so far at least in a faster way especially for beginners. These are:
1. Through tcode SWI1 logs and
2. Through background process deactivation
Okay, without any further ado, let's begin with no. 1 - debugging through SWI1:
The first thing that we need to do is to see it that the transaction that needs to be checked includes workflow process, otherwise there will be no logs available in SWI1 for that specific process you are supposed to debug. Okay, so assume that you have a valid workflow process, you may now run tcode SWI1 after running your process or transaction. Below is the screenshot of SWI1 log initial screen:


So, let us say that you are aware of the item that you are looking for, you should then select it and proceed by clicking the workflow log icon :
The first thing that we need to do is to see it that the transaction that needs to be checked includes workflow process, otherwise there will be no logs available in SWI1 for that specific process you are supposed to debug. Okay, so assume that you have a valid workflow process, you may now run tcode SWI1 after running your process or transaction. Below is the screenshot of SWI1 log initial screen:
Then, you may enter the IDentification if you know it, otherwise just proceed if you are just minutes away before landing on SWI1.

Below, depending on your default setting, a workflow log will appear as the below view:

As with my preference, I usually view this on a List with Technical details and this can be found by clicking the second icon on the taskbar.


Double click the object type to view the class methods as shown below:

In our example, double click the read_step_occurence to view the ABAP code and you may now look for the line of codes that you may want to put the break-point into.

Okay, I can see now the smile on your face, if not don't worry as we are not yet finished! :)
To start with the actual debugging, let's go back to the workflow log with technical details and look for the request ID generated. This can be found in the container tab and this request id assignment in the workflow container varies from the design of your application:

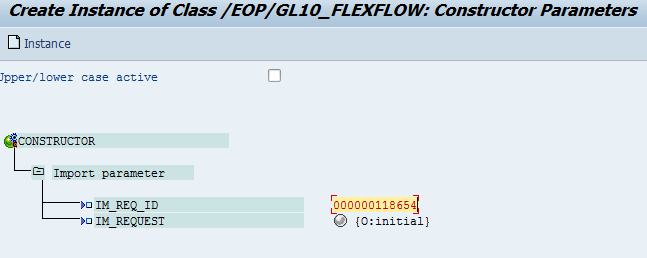
After the instance has been created, you may now run the method of the task and make sure it is where you put your break-point on.

By clicking the above icon, you are then required to enter some parameters to process your debugging correctly.

You may now generate the debugging screen by clicking any one of the clock icons above.
ABS_REQ_EE can be found also in the container together with the REQID.
Then, voila! your break-point is now triggered.

Enjoy and please don't forget to share or like!
Background process: In this case, the break-point should be triggered when running your actual tcode or program and not inside SWI1 unlike the other process above.
1. Put a breakpoint to the method in BOR where being processed by the workflow
2. Double check the particular task where you set the break-point and where the method belongs to.
3. Inside the task, uncheck the background processing
3b. Uncheck the dialog check box when you double click the method in bor
4. Click binding or as long as the agent will become editable. 5. Change the agent fields to User then put your account ID adjacent.
6. Save and Activate the workflow.
Test:
To test, perform your project and after processing it, there should be a workflow item in your inbox - click it and the debugging window should now appear and stop to your break point.
NOTE:
1. If agent field still not editable when unchecking the background check box then you may run swu_obuf to refresh, log-off - log-on or to uncheck and check other checkboxes.
2. Make sure to edit the updated workflow version.
Monday, February 04, 2013
SAP Payment through DMEE
1. Create your DMEE mapping in DMEE tcode:
a. Usually payment is done under tree type PAYM and type the name of your format tree then click create:

b. You should provide proper node hierarchy and the basic should look like the one below:

d. You should also determine the proper sorting per level:

f. Each element can be mapped in variety of ways as shown in the mapping procedure:

e. Atom is used usually when you want to concatenate nodes.
f. Exit module if there is a special procedure needed before showing the data such as this standard function modules
g. The best exit module that can be used is the "DMEE_EXIT_TEMPLATE_EXTEND_ABA"
In this module, you may filter the reference node, format tree and other filters you may want to add based on table FPAYH, FPAYHX, and FPAYP.
h. You may also consider adding a parameter table for each field. In our example below we used country code, country key, reference field, and format tree as parameters:
SELECT SINGLE SUBR FROM YFIDMESUBR INTO l_wa_subr-subr
WHERE bland = wa_item-FPAYP-bland AND
bukrs = wa_item-FPAYP-bukrs AND
tree_id = wa_extension-node-tree_id AND
ref_name = wa_extension-node-ref_name.
SUBR field will contain your subroutine that you may use to filter specific logic inside the function module exit specific for each country, country key, etc.
2. Determine your enhancement in what category in order to locate the appropriate data in tcode FBZP.
EX:
a. Selecting Payment methods by country in FBZP:


c. Enter the appropriate setup based on the requirements and don't forget to fill up the Payment Medium area:

Notes: Put "DMEE" as node reference for reference type element for type 4 and 5.
Wednesday, January 30, 2013
SAP Sessions and Memories
There are different kind of SAP Sessions and Memories that you may use in your programming techniques. In every user or login in SAP, the system creates several so called EXTERNAL Session which contains and has an access in so called SAP Memory through get/set parameter (will discuss this vividly later). Inside the external session, there is another session called INTERNAL Session which composes of different running programs and an ABAP Memory. Each of these programs inside the internal session may access data in the ABAP Memory whereas, SAP Memory may access by the programs within the internal session of the external session.
Sessions and program relationship:

Monday, January 28, 2013
Confused of SAP LUW and DB LUW?
DB LUW (Database Logical Unit of Work) is simply a generic term being used in referring to database maintenance in logical way i.e commit and roll-back done synchronously or asynchronously.
SAP LUW (SAP Logical Unit of Work) comprises of more than one dialog steps and this is the way SAP handles its DB LUW. To ensure the consistency of database changes, commit and roll back command should be included in the program. There is a technique to ensure consistency of data update within SAP LUW by bundling.
Three type of bundling techniques being used in SAP LUW:
1. Bundling using Function Modules for Updates by using CALL FUNCTION... IN UPDATE TASK
2. Bundling Using Subroutines by using PERFORM ON COMMIT
3. Bundling Using Function Modules in Other R/3 Systems by using CALL FUNCTION... IN BACKGROUND TASK DESTINATION...
Monday, January 14, 2013
I got my ITIL Certificate!
based on ITIL Official Site
- improved IT services
- reduced costs
- improved customer satisfaction through a more professional approach to service delivery
- improved productivity
- improved use of skills and experience
- improved delivery of third party service.

Sunday, January 13, 2013
Value and Check Table
Value and Check tables are both transparent tables and differs only on the context in where they are being used. An SAP table being used in a domain is called value table and it can be found in the value range tab as shown below:

In an ALV grid, if you want to create a drill down help popup window or F4 function, you may either choose Single Values (limited to 10 characters), Intervals, or Value table. In choosing Value table, you need first to create you transparent table, usually contains columns for the value you want to display in your ALV and the description of that particular value, and populate your records or entries as shown below:

Typically, in ALV F4 function, the popup window being shown will contain the Single values unless you made your transparent table as the check table of your ALV table as shown below:

So, the question is, how this value table becomes a check table. The answer is simply making the component or the field of the table above as foreign key by clicking the button that looks like a key:

Below is the window to make the table as check table and you may also add the columns in the F4 popup by making it as primary key.

In my case, MANDT, ACTION, and DESCR fields are the primary keys. Therefore, if the user clicks the drill down or F4 button, the below window should appear:

NOTE: Check table is used to validate the data being inputted - foreign key table level. Value table will contain the data for check table - domain level. Search help should contain the values of the table specified on the parameters. Therefore, if there are check table and search help, search help's table values will be shown and check table will be used as look up for the value being inputted in either selection screen or alv grid cell.
Until next time!
Have a great day!
Subscribe to:
Posts (Atom)